
Are you converting a shipping container into a livable space, but worried about the lack of ventilation? Proper airflow is crucial for maintaining a healthy and comfortable environment inside the container.
Without adequate ventilation, the air can become stale, and moisture can build up, leading to mold and mildew. So, how can you ensure your shipping container is well-ventilated?
Installing a vent is a simple and effective solution. In this article, we will guide you through a step-by-step process on DIY shipping container vent installation, making it easy to achieve proper airflow.
Key Takeaways
- Importance of ventilation in shipping containers
- Step-by-step guide for adding a vent
- Benefits of proper airflow
- Simple DIY installation process
- Improved comfort and health inside the container
Why Proper Ventilation is Essential for Shipping Containers
Effective shipping container ventilation is key to preventing damage to stored goods. Proper ventilation is crucial for maintaining a healthy environment inside the container, which is essential for storing goods over extended periods.
Preventing Condensation and Moisture Buildup
One of the primary reasons ventilation is essential is to prevent condensation and moisture buildup inside the container. When goods are stored in a poorly ventilated container, moisture can accumulate, leading to mold, mildew, and damage to the goods. Best practices for ventilating shipping containers include ensuring adequate airflow to remove moist air and prevent condensation.
Regulating Temperature
Ventilation also plays a critical role in regulating the temperature inside shipping containers. Extreme temperatures can damage goods, and without proper ventilation, containers can become overheated or too cold. By allowing for airflow, vents help to maintain a more stable temperature, protecting the goods stored inside.
Improving Air Quality
Furthermore, venting options for shipping containers can significantly improve the air quality inside the container. Stale air can be a problem, especially when containers are sealed for long periods. Ventilation helps to circulate fresh air, reducing the risk of stale air and maintaining a healthier environment for the goods.
In conclusion, proper ventilation is vital for shipping containers to prevent condensation and moisture buildup, regulate temperature, and improve air quality. By understanding the importance of shipping container ventilation, individuals can take steps to ensure their containers are well-ventilated, protecting their goods and maintaining a safe storage environment.
Types of Vents for Shipping Containers
The type of vent used in a shipping container can significantly impact its internal environment and overall functionality. When converting or utilizing shipping containers for various purposes, proper ventilation is crucial to prevent issues such as moisture buildup, condensation, and stale air.
Passive Vents
Passive vents are a popular choice for shipping container ventilation due to their simplicity and effectiveness. They work by allowing natural airflow into and out of the container without the need for mechanical assistance.
Louvered Vents
Louvered vents are designed with angled slats that allow air to enter while keeping rain and debris out. They are a great option for providing consistent ventilation.
Mushroom Vents
Mushroom vents are another type of passive vent that protrude from the roof, allowing hot air to escape. They are particularly effective in warm climates.
Whirlybird Vents
Whirlybird vents, also known as turbine vents, use wind power to spin and extract hot air from the container. They are an efficient and eco-friendly ventilation solution.
Active Ventilation Systems
Active ventilation systems, on the other hand, use mechanical means to circulate air and improve ventilation within the shipping container.
Electric Fans
Electric fans are a common component of active ventilation systems, providing a reliable means of circulating air and reducing stagnation.
Solar-Powered Vents
Solar-powered vents offer an eco-friendly alternative, using solar energy to power fans or other ventilation mechanisms.
Wind-Driven Turbine Vents
Wind-driven turbine vents harness the power of the wind to ventilate the container, providing an energy-efficient solution.
Choosing the Right Vent for Your Needs
When selecting a vent for your shipping container, consider factors such as climate, intended use, and budget. Proper ventilation is key to maintaining a healthy and functional environment within the container. By understanding the different venting options available, you can make an informed decision that meets your specific needs.
Planning Your Ventilation System
Proper planning of your ventilation system is essential for ensuring the longevity and usability of your shipping container. A well-planned ventilation system helps in maintaining optimal air quality and temperature, thereby protecting the contents of the container.
Determining Optimal Vent Placement
The placement of vents is critical for effective ventilation. Ideally, vents should be placed to facilitate cross ventilation, allowing fresh air to enter and stale air to exit. Consider the container’s orientation and the prevailing wind direction when deciding on vent placement.
Calculating How Many Vents You Need
The number of vents required depends on several factors, including the size of the container, its intended use, and the environmental conditions it will be exposed to. A general rule of thumb is to have at least one vent per 10 feet of container length. However, this may need to be adjusted based on specific requirements.
| Container Size (feet) | Recommended Number of Vents |
|---|---|
| 20 | 2 |
| 40 | 4 |
Creating a Layout Plan
Once you’ve determined the optimal vent placement and calculated the number of vents needed, create a detailed layout plan. This plan should include the exact locations of vents, taking into account any internal obstructions or features. A well-designed layout ensures that your ventilation system operates efficiently.
By following these steps, you can create an effective ventilation system for your shipping container, enhancing its functionality and longevity.
Tools and Materials Needed to Put a Vent in a Shipping Container
Before you start putting a vent in your shipping container, make sure you have all the necessary tools and materials. Proper preparation is key to a successful installation.
Essential Tools List
Having the right tools is crucial for installing a vent in your shipping container. Here are the essential tools you’ll need:
Cutting Tools
- Reciprocating saw or a circular saw for cutting through metal
- Grinder for smoothing edges
Measuring and Marking Tools
- Tape measure for accurate measurements
- Marker or chalk for marking cut lines
Assembly Tools
- Drill for making holes for screws or bolts
- Wrenches and sockets for tightening fasteners
Required Materials
In addition to tools, you’ll need the right materials to complete the installation:
Vent Components
- Ventilation unit suitable for shipping containers
- Vent frame for a secure fit
Sealants and Weatherproofing
- Silicone sealant to prevent water ingress
- Weatherproof tape for added protection
Fasteners and Hardware
- Screws or bolts for securing the vent
- Nuts and washers for assembly
| Tool/Material | Description | Quantity |
|---|---|---|
| Reciprocating saw | For cutting metal | 1 |
| Ventilation unit | Suitable for shipping containers | 1 |
| Silicone sealant | For weatherproofing | 1 tube |
Safety Equipment
Safety should never be compromised. Ensure you have the following safety equipment:
- Safety glasses to protect your eyes
- Work gloves to prevent injuries
- Dust mask for protection against dust and debris
Step-by-Step Guide: How to Put Vent in Shipping Container
Ventilation is key to preventing condensation and ensuring the longevity of your shipping container’s contents. Proper ventilation helps regulate temperature and moisture levels, creating a more stable environment inside the container.
Preparing the Container
Before you start installing a vent, it’s crucial to prepare your shipping container. This involves two main steps: cleaning the installation area and taking accurate measurements.
Cleaning the Installation Area
Ensure the area where you’ll be installing the vent is free from dirt, rust, and any other debris. Use a wire brush to clean the surface, and if necessary, apply a rust inhibitor to protect the metal.
Taking Accurate Measurements
Measure the space where you plan to install the vent, taking into account the vent’s dimensions and any additional space needed for the frame. Accurate measurements are crucial for a secure and proper fit.
Marking and Cutting the Opening
Once you’ve prepared the container, it’s time to mark and cut the opening for your vent. This process involves creating a template, using safe cutting techniques, and handling metal edges carefully.
Creating a Template
Use cardboard or a similar material to create a template that matches the vent’s dimensions. This template will help you accurately mark the area to be cut.
Safe Cutting Techniques
Employ a suitable cutting tool, such as a jigsaw or a reciprocating saw, to cut along the marked lines. Always wear protective gear, including gloves and safety glasses, to prevent injury.
Handling Metal Edges
After cutting, use a file or grinder to smooth out the metal edges to prevent injuries and ensure a clean surface for the vent installation.
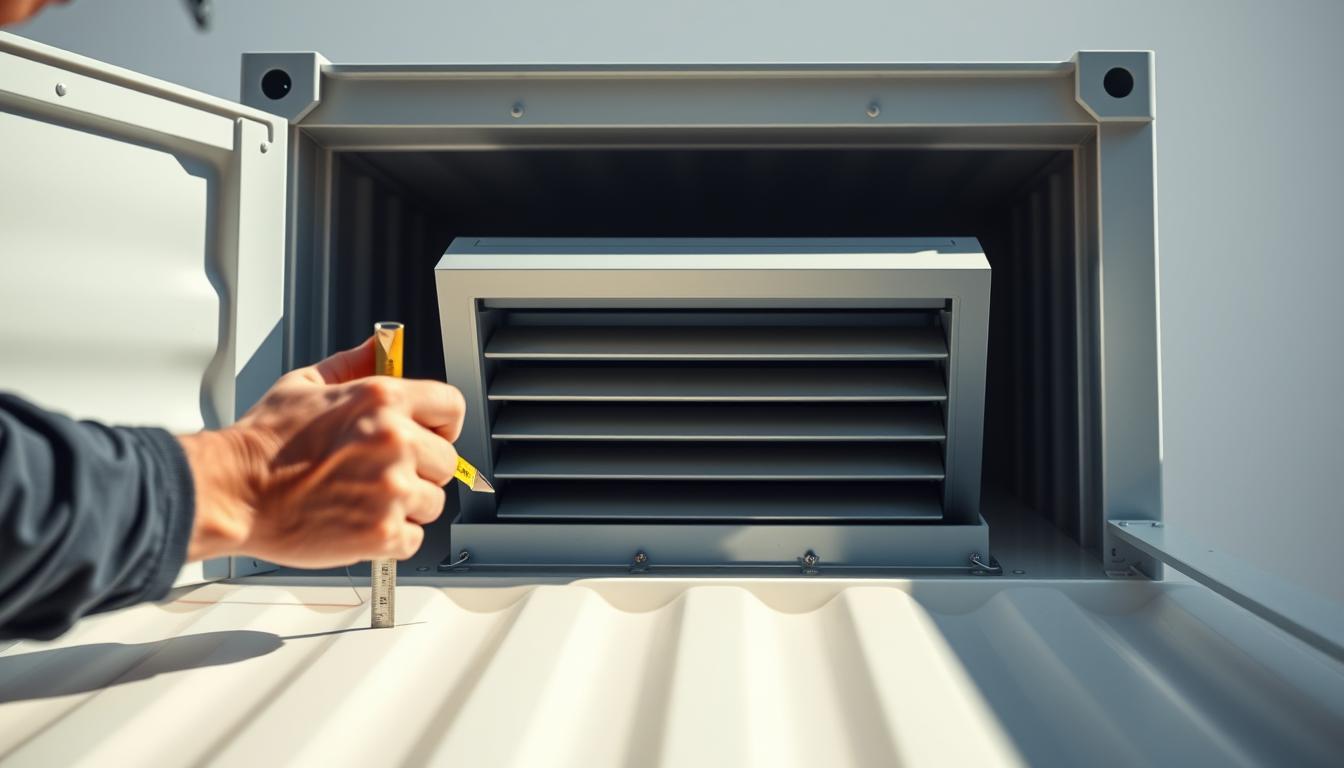
Installing the Vent Frame
With the opening cut out, the next step is to install the vent frame. This involves aligning the frame, securing it, and checking for level installation.
Aligning the Frame
Carefully place the vent frame over the opening, ensuring it’s properly aligned with the surrounding area.
Securing the Frame
Use appropriate fasteners, such as screws or rivets, to secure the frame in place. Make sure they’re tightened firmly to prevent any movement or leakage.
Checking for Level Installation
Verify that the vent frame is installed level to ensure proper operation and to prevent water from accumulating around the vent.
| Step | Description | Tools Required |
|---|---|---|
| 1 | Prepare the Container | Wire brush, rust inhibitor |
| 2 | Mark and Cut the Opening | Jigsaw or reciprocating saw, safety gear |
| 3 | Install the Vent Frame | Screws or rivets, level |
Sealing and Weatherproofing
To ensure the vent installation is effective and durable, it’s essential to seal and weatherproof the area around the vent.
Applying Sealant
Use a high-quality sealant around the vent frame to prevent water ingress and reduce the risk of condensation.
Adding Flashing (if necessary)
If required, add flashing around the vent to provide an extra layer of protection against the elements.
Testing for Water Tightness
Perform a water test to ensure the vent installation is watertight. This can be done by spraying water around the vent and checking for any leaks.
Final Adjustments and Testing
After completing the installation, make any necessary adjustments to ensure the vent operates smoothly. Test the vent to verify it’s functioning as expected.
By following these steps, you can successfully install a vent in your shipping container, enhancing its functionality and the safety of its contents.
Cost and Time Considerations
Before you start installing a vent in your shipping container, it’s essential to evaluate the associated costs and time requirements. Understanding these factors will help you plan your project more effectively and avoid potential pitfalls.
Budget Breakdown for Different Vent Types
The cost of ventilation kits for shipping containers can vary significantly depending on the type and quality of the vent. Passive vents are generally more affordable, with prices ranging from $100 to $500. Active ventilation systems, on the other hand, can be more expensive, costing between $500 and $2,000 or more, depending on their complexity and features.

DIY vs. Professional Installation Costs
When it comes to DIY shipping container vent installation, the cost can be significantly lower compared to hiring a professional. However, it’s crucial to consider the potential risks and challenges associated with DIY installations, such as improper sealing or damage to the container. Professional installation costs can range from $500 to $2,000, depending on the complexity of the job and the installer’s rates.
Estimated Time Requirements
The time required for installing a vent in a shipping container can vary depending on the individual’s level of expertise and the tools available. On average, a DIY installation can take anywhere from a few hours to a full day. Professional installations, on the other hand, are typically faster, taking around 1-3 hours, depending on the complexity of the job.
Advanced Ventilation Options for Shipping Containers
Advanced ventilation systems can significantly enhance the functionality of shipping containers. As the demand for more sophisticated storage and workspace solutions grows, the need for advanced ventilation technologies has become increasingly important.
Automated Ventilation Systems
Automated ventilation systems offer a significant upgrade over manual vents, providing real-time adjustments to maintain optimal conditions inside the container.
Humidity-Controlled Vents
These vents adjust based on the humidity levels, preventing moisture buildup and reducing the risk of mold and mildew.
Temperature-Responsive Systems
Temperature-responsive systems ensure that the internal temperature remains within a specified range, crucial for storing sensitive goods.
Smart Ventilation Controls
Smart controls integrate with other systems, allowing for remote monitoring and adjustments, enhancing the overall efficiency of the ventilation system.
Integrated HVAC Solutions
For containers that require precise temperature control, integrated HVAC (Heating, Ventilation, and Air Conditioning) solutions are available. These systems provide comprehensive climate control, making shipping containers suitable for a wider range of applications.
According to industry experts, “Integrated HVAC systems are revolutionizing the way shipping containers are used, making them viable for office spaces, storage facilities, and even living quarters.”
“The versatility offered by HVAC-integrated shipping containers is unprecedented.”
Eco-Friendly Ventilation Alternatives
Eco-friendly ventilation alternatives are gaining popularity as they offer sustainable solutions without compromising on performance. Solar-powered vents and wind-powered ventilation systems are examples of such alternatives.
| Ventilation Type | Key Features | Benefits |
|---|---|---|
| Automated Ventilation | Real-time adjustments, humidity and temperature control | Optimal internal conditions, reduced maintenance |
| Integrated HVAC | Comprehensive climate control | Suitable for diverse applications, enhanced versatility |
| Eco-Friendly Alternatives | Solar-powered, wind-powered | Sustainable, reduced energy costs |
Troubleshooting and Maintenance
Troubleshooting common problems with shipping container vents can save time and money. Proper maintenance ensures that your ventilation system operates effectively, preventing potential issues that could lead to costly repairs or replacement.
Common Installation Problems
When installing vents in shipping containers, several issues can arise. These include leaks around vent seals, improper airflow, and condensation problems.
Leaks Around Vent Seals
Leaks can occur if the vent seal is not properly secured or if the sealant deteriorates over time. Regularly inspect the seals and reapply sealant as needed.
Improper Airflow
Improper airflow can result from incorrect vent placement or insufficient vent size. Ensure that vents are installed according to the manufacturer’s instructions and your container’s specific needs.
Condensation Issues
Condensation can be minimized by ensuring adequate ventilation and using vents that are designed to reduce moisture buildup.
Regular Maintenance Schedule
Regular maintenance is crucial for the longevity of your shipping container’s ventilation system. This includes monthly checks, seasonal maintenance, and annual inspections.
Monthly Checks
Inspect vents for blockages and ensure that they are functioning correctly.
Seasonal Maintenance
Clean vents and check for any signs of wear or damage. Replace filters as necessary.
Annual Inspections
Conduct a thorough inspection of the ventilation system, including all vents and ductwork, to identify any potential issues before they become major problems.
When to Replace or Upgrade Your Vents
Knowing when to replace or upgrade your vents is essential for maintaining optimal ventilation. Consider replacement if you notice significant wear, decreased performance, or if your ventilation needs have changed.
| Maintenance Task | Frequency | Notes |
|---|---|---|
| Inspect Vents | Monthly | Check for blockages and proper function |
| Clean Vents | Seasonally | Remove dirt and debris |
| Inspect System | Annually | Thorough check of vents and ductwork |

“Regular maintenance of your shipping container’s ventilation system is not just about preventing issues; it’s about ensuring the longevity and efficiency of your storage solution.”
By following these guidelines and maintaining your shipping container’s ventilation system, you can ensure that it continues to operate effectively, safeguarding your goods and extending the life of your container.
Conclusion
Proper ventilation is crucial for maintaining a safe and healthy environment within your shipping container. By understanding the importance of ventilation and following the steps outlined in this article, you can ensure your container remains dry, temperature-regulated, and well-ventilated.
To put vent in shipping container, you’ve learned about the different types of vents available, including passive and active ventilation systems. Planning your ventilation system, determining optimal vent placement, and calculating the number of vents needed are all critical steps in the DIY shipping container vent installation process.
By following the step-by-step guide provided, you’re now equipped to prepare your container, mark and cut the opening, install the vent frame, seal and weatherproof, and make final adjustments. Regular maintenance and troubleshooting will also help you identify and address any potential issues.
With your newfound knowledge, you’re ready to take on your DIY shipping container vent installation project with confidence. Effective ventilation will not only protect your goods but also enhance the overall functionality of your shipping container.