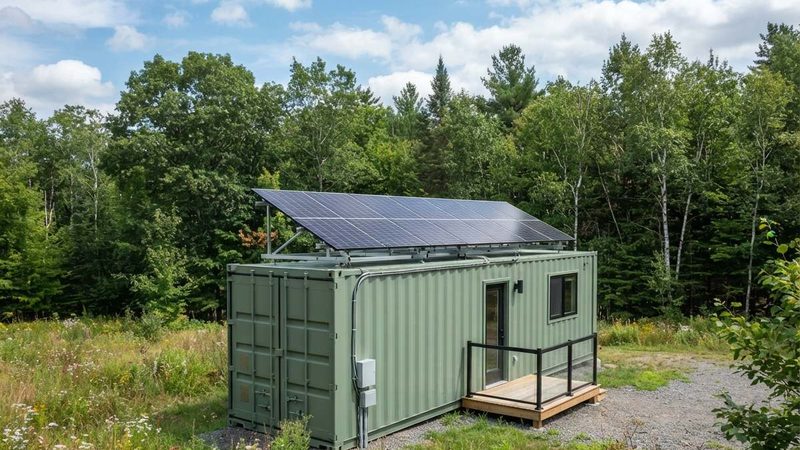
A shipping container home is an ideal solar host: flat steel roof with a natural mounting surface, compact energy footprint manageable with a modest panel array, and often sited in locations where grid power is unavailable or expensive. This guide covers the complete installation process from energy audit through commissioning, including NEC 2023 code requirements.
Electrical wiring to the load center requires a licensed electrician in most jurisdictions. Solar systems generating over a threshold wattage require permit and inspection. Always get your system inspected before energizing the load panel.
01 — System ComponentsWhat Every Part Does
| Component | Function | Key Selection Criteria |
|---|---|---|
| Solar panels | Convert sunlight to DC electricity | 400W monocrystalline is the standard for container homes; efficiency 19–22%; 25-year performance warranty |
| MPPT charge controller | Regulates charging; prevents overcharge | Always MPPT (not PWM) for any system over 200W; 93–99% efficient; sized to array wattage and battery voltage |
| Battery bank (LiFePO4) | Stores energy for night/cloudy days | LiFePO4 only for container homes — 3,000–6,000 cycles, 80–100% DoD, no ventilation required, 10+ year life |
| Inverter-charger | Converts DC to 120/240V AC; charges from generator | Size for continuous load + surge capacity (mini-split startup can demand 3× running watts) |
| Wiring & protection | Safe current delivery; fault protection | NEC Article 690 governs; DC-rated fuses and breakers required; USE-2 or PV wire for all outdoor panel runs |
02 — Battery SelectionWhy LiFePO4 Is the Only Serious Choice
| Chemistry | Cycles | Usable DoD | Safety | Verdict |
|---|---|---|---|---|
| Flooded Lead-Acid | 200–500 | 50% | Hydrogen off-gassing; ventilation required | Avoid |
| AGM Lead-Acid | 300–500 | 50% | Sealed; limited off-gassing | Budget option only |
| LiFePO4 (LFP) | 3,000–6,000 | 80–100% | Safest lithium; no thermal runaway | Strongly recommended |
| NMC Lithium | 500–1,500 | 80% | Thermal runaway risk in enclosed spaces | Avoid in container homes |
Browse Containers Suitable for Solar Builds
One-trip containers offer intact structural rails — the correct attachment point for solar mounting hardware.
Browse Containers on eBay →03 — System SizingFrom Daily kWh to Full Specification
Every sizing decision flows from one number: your daily energy consumption in watt-hours. Multiply each appliance’s wattage by hours-per-day used, then sum. The mini-split dominates — often 50–70% of total daily consumption. Proper insulation reduces HVAC demand and saves more per dollar than adding panels.
Step 1 — Solar array size
Formula: Array (W) = Daily Wh ÷ (Peak Sun Hours × 0.80 system efficiency)
| Scenario | Daily Wh | Array Required | Approx. Panels (400W) |
|---|---|---|---|
| Minimalist 20-ft (no AC) | 3,500 Wh | 1,200W | 3 panels |
| Comfortable 20-ft | 6,000 Wh | 2,000W | 5 panels |
| Full 40-ft home with AC | 12,000 Wh | 4,000W | 10 panels |
| Multi-container home | 30,000 Wh | 8,800W | 22 panels |
Step 2 — Battery bank size
Formula: Battery Bank (Wh) = Daily Wh × Days Autonomy ÷ DoD
Use 2 days autonomy and 0.80 DoD for LiFePO4. A full 40-ft home needs ~30 kWh of battery capacity — typically 3× 10.24 kWh 48V server rack batteries.
Step 3 — Inverter size
The inverter surge rating must exceed your largest single motor startup load. A 12k BTU mini-split demands 4,000–6,000W at startup. A 3,000W continuous / 6,000W surge inverter-charger is the minimum for a 40-ft home with a mini-split.
04 — Panel MountingOn a Container Roof
The container’s top rails are the correct mounting attachment point — not the corrugated sheeting between them. The sheeting is a weather barrier, not a structural element.
| Method | Roof Penetration? | DIY Friendly? | Best For |
|---|---|---|---|
| Container rail clamp kits | No | Yes — recommended for most DIY builds | Clean install; adjustable tilt; no waterproofing risk |
| Weld-on brackets to rail | No | Intermediate (welding required) | Permanent; maximum strength |
| Drill-through with EPDM screws | Yes | Intermediate | When rail mounting not feasible; inspect sealant every 2–3 years |
All exposed metal parts of the panel array must be bonded and grounded. Use listed WEEB grounding clips between panel frame and mounting rail — anodized aluminum frames do not make reliable ground contact without breaking through the oxide layer. Test continuity from panel frame to container chassis to grounding electrode; must measure under 1 ohm.
05 — Wiring & ProtectionSeries vs Parallel, Wire Sizing, Fuses
For container home systems, wire panels in series with an MPPT controller. Higher voltage means lower current, which means smaller and cheaper wire. A 30A circuit at 20 ft needs 6 AWG at 12V but only 10 AWG at 48V — roughly 4× less copper at 48V.
| Circuit Segment | Recommended Wire | Notes |
|---|---|---|
| Panel string to MPPT (48V system) | 10–12 AWG USE-2 or PV wire | USE-2 required for outdoor UV-exposed runs; standard THHN degrades in sunlight |
| MPPT controller to battery | 4–2 AWG stranded copper | Keep this run as short as possible — highest efficiency loss per foot |
| Battery bank to inverter (48V) | 4–2 AWG stranded copper | 48V dramatically reduces current vs 12V; keep under 6 ft if possible |
| Battery positive terminal fuse | Class T fuse, 200kA interrupt rating | CRITICAL — within 18” of battery terminal; LiFePO4 can deliver enormous fault current |
Always connect in this order: (1) battery to charge controller; (2) solar panels to charge controller; (3) inverter to battery last. Connecting panels before the battery sends unregulated voltage to the controller output and permanently destroys it. Disconnect in reverse order.
Insulation — The Most Effective Energy Savings
Proper insulation reduces HVAC demand more cost-effectively than adding solar panels. Closed-cell spray foam on the roof is the single highest-leverage improvement.
Shop Insulation on Amazon →06 — Three Complete ConfigurationsWorked Examples
| Configuration | System Spec | Total Cost (2025) |
|---|---|---|
| A: Minimalist 20-ft weekend cabin Lights, fridge, fan, charging — no AC | 3× 400W panels; 40A MPPT; 2× 100Ah 48V LiFePO4; 1,600W inverter-charger | $2,550–$4,760 |
| B: Full-time 40-ft container home Mini-split, fridge, water pump, washer, all loads | 10× 400W panels; 70–80A MPPT; 3× 10.24 kWh 48V racks; 6,000W inverter-charger | $9,850–$18,400 |
| C: Multi-container home (2×40-ft) Electric cooking, well pump, two mini-splits, EV option | 22× 400W panels; all-in-one Sol-Ark 15K or EG4 18KPV; 5× 10.24 kWh racks | $16,300–$31,000 |