Watch on YouTube: youtu.be/kEo9z4HA3D8 ↗
01 — OverviewWhy Framing Method Determines Everything
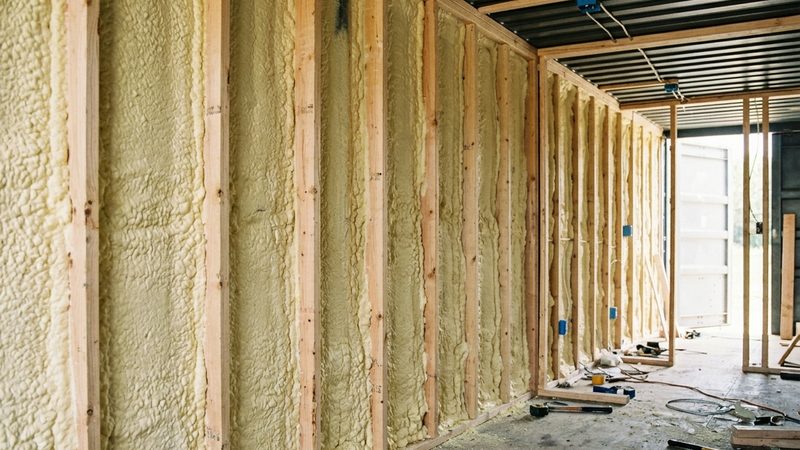
Interior framing is the decision that sets the thermal performance, moisture resistance, and usable floor plan of a container home for its entire life. It is also one of the most commonly done wrong. Most first-time builders frame the same way they would a conventional stud wall — running lumber directly against the steel container walls — and create three problems that are expensive and sometimes impossible to fix after the fact: thermal bridging, condensation at wood-to-steel contact points, and permanent loss of interior width.
The ContainerVents video documents a bracket-based approach that addresses all three problems simultaneously. The laser-cut Wood Stud Brackets hold 2x4 lumber at a standoff distance from the container wall, creating a gap for insulation while keeping wood off cold steel. This is not merely a product demonstration — it is a tutorial on the underlying principles of correct container interior framing that applies regardless of whether the proprietary brackets are used.
02 — The ProblemWhy You Cannot Frame Against Container Steel
Thermal bridging — the silent energy thief
Steel conducts heat approximately 400 times more efficiently than wood and 1,600 times more efficiently than still air. Any framing member that physically contacts the container steel creates a direct heat flow path that bypasses the insulation entirely.
- A 2x4 stud touching the steel wall conducts heat from cold exterior steel directly into the interior, cooling the stud surface to near exterior temperature regardless of insulation between studs
- In a conventional stud wall against cold steel, the studs themselves become the coldest spots in the wall assembly — the opposite of their intended function
- Thermal bridging through direct-contact framing can reduce the effective R-value of a container wall by 30–60% compared to the theoretical R-value of the insulation alone
Condensation at wood-to-steel contact points
Any wood in direct contact with cold steel accumulates moisture at the contact surface. Sustained moisture at the wood-to-steel interface produces mold in the wood, accelerated rust on the Corten steel wall, and eventual structural degradation of the framing members — all hidden behind wall cladding and undetectable until significant damage has occurred.
Interior width loss
A 20-ft standard container has an interior width of approximately 7’8” (92.5 inches). Direct-against-wall framing with 2x4s (3.5 inches) plus drywall (0.5 inches) on each side removes approximately 8 inches from usable width. In a space where width is already the binding constraint, that loss is permanent.
The standoff gap between framing and container steel is not optional — it is the mechanism that prevents thermal bridging and allows closed-cell spray foam to form a continuous vapor barrier behind the studs. Every container framing method, whether using proprietary brackets or not, must achieve this gap.
03 — The Bracket SystemHow Wood Stud Brackets Work
The ContainerVents Wood Stud Brackets (Container Modification World®) are laser-cut folded steel brackets that attach to the container’s top tubing via self-tapping screws — no drilling or welding required. The bracket’s geometry positions the 2x4 stud at a precise standoff distance from the container wall, creating a consistent gap across the full wall surface.
- Wall plane: all studs sit at the same standoff distance, creating a flat consistent plane regardless of the corrugated wall profile
- Ceiling plane: ceiling joists are held at uniform height from the top tubing, creating a level ceiling without shimming or custom cutting
- Insulation void: the gap between stud and container wall is the spray foam zone — closed-cell foam fills this gap, bonding to both steel and stud, eliminating all air movement
- Vapor barrier continuity: spray foam fills the gap behind the stud without obstruction, forming a continuous vapor barrier from floor to ceiling with no interruptions at framing members
| Kit | Contents | Best For | Amazon |
|---|---|---|---|
| 10-bracket kit | 2 Corner Casting Covers + 10 Brackets + Hardware | Small rooms, storage areas, 10-ft sections | amzn.to/3UHGyIx |
| 40-bracket kit | 2 Corner Casting Covers + 40 Brackets + Hardware | Full 20-ft container (all four walls) | amzn.to/3TIDbji |
| Wood Stud Kit (CA) | Interior Wood Stud Framing Brackets x10 | Canadian market | amzn.to/46stZGs |
Shop Container Framing Brackets on Amazon
Container Modification World® Wood Stud Brackets — laser-cut folded steel, self-tapping installation, no welding required. Available in 10, 20, and 40-bracket kits.
Shop Framing Brackets on Amazon →04 — InstallationCeiling First, Then Walls
The ceiling-first sequence is the correct order — ceiling joists must be installed before wall studs can be cut to length and positioned under them.
- Mark the container top tubing — the horizontal square steel tube running the full length just below the roof — at consistent intervals (16 or 24 inches on center)
- Install ceiling brackets in pairs (one per side) at each marked position; self-tapping screws into top tubing; bracket geometry auto-aligns the stud position
- Cut and install 2x4 ceiling joists from bracket to bracket; measure each individually as container interiors vary slightly from nominal dimensions
- Install wall brackets and studs following the same principle; corner casting covers included in kit handle the most challenging framing attachment point
- Apply closed-cell spray foam into the gap behind all studs and ceiling joists before cladding; fill all corrugation valleys accessible between studs
- Clad with drywall, plywood, or cladding of choice after spray foam fully cures (minimum 24 hours)
05 — Method ComparisonAll Framing Approaches Evaluated
| Method | Thermal Bridge | Vapor Barrier | Width Loss | Best For |
|---|---|---|---|---|
| Direct 2x4 against steel (AVOID) | Severe | Poor | Maximum: 3.5” per wall | Not recommended for any container application |
| Bracket + 2x4 + spray foam | Minimal | Excellent | Moderate: 3.5” per wall | Storage, workshops, non-habitable spaces |
| Bracket + 1-5/8” steel studs + spray foam | Minimal | Excellent | Minimum: 1.625” per wall | Recommended for container homes |
| Full spray foam (no framing) | None | Excellent | 2–3” per wall (foam only) | Maximum thermal performance |
| InSoFast panel system | Minimal | Good | 2.25–3.25” per wall | DIY builds without spray foam equipment |
| Rigid foam + hat channel | Moderate | Good | 1–3” per wall | Budget builds, lower-demand climates |
06 — Wood vs. Steel StudsThe ContainerVents Official Guidance
ContainerVents makes an explicit recommendation that deserves its own section: for container homes (human-occupied), use steel studs, not wood 2x4s. For non-human-occupied spaces (storage, workshops), wood with the bracket system is acceptable.
| Factor | Wood 2x4 | 1-5/8” Steel Studs | Composite Lumber |
|---|---|---|---|
| Width impact | 3.5” depth | 1.625” depth — gains ~2” per wall | Same as wood |
| Moisture resistance | Poor — absorbs moisture; mold risk | Excellent — does not absorb moisture | Excellent — no moisture absorption |
| Fire resistance | Combustible | Non-combustible | Varies by product |
| Cost | Lowest | Slightly higher | Highest |
| ContainerVents guidance | Non-habitable spaces only | Recommended for homes | Humid environments |
1-5/8” steel studs gain approximately 2 inches of interior width per wall pair compared to 2x4s. In a 7’8” container interior, the difference between 2x4 framing and steel stud framing is the difference between feeling tight and feeling livable.
Container Home Insulation on Amazon
Closed-cell spray foam kits and vapor barriers for container builds. The bracket system and spray foam are a system — deploy them together.
Shop Insulation on Amazon →07 — Insulation IntegrationSpray Foam and the Bracket System Work Together
The bracket system specifically assumes closed-cell spray foam insulation. The two elements are a system — brackets without spray foam in the gap leave the thermal bridge partially intact and the vapor barrier discontinuous at stud locations.
- Closed-cell spray foam bonds to both steel and wood, filling the bracket gap completely and curing into a rigid vapor barrier (Class II at 2+ inches)
- R-6 to R-7 per inch — 2 inches of foam in the bracket gap achieves R-12 to R-14 behind the stud, without a direct thermal bridge to the steel
- Spray foam in the bracket gap also bonds the stud physically to the container, reinforcing the bracket attachment and adding structural rigidity
- Ceiling is the highest-priority surface: target minimum 3 inches (R-18 to R-21) on the roof; 4–5 inches in climates with significant summer heat gain. Roof insulation is the single highest-leverage thermal improvement in any container build.
Blueprint Sets That Specify Correct Framing
A proper plan set includes insulation sequence, framing standoff details, and vapor barrier specification. Find permit-ready container home plans on Amazon from $29.
Browse Blueprint Sets on Amazon →Key lessons from the ContainerVents framing guide
- Framing directly against container steel without a thermal break is the single most consequential mistake in container interior construction. It reduces insulation effectiveness by 30–60%, creates hidden condensation damage at wood-to-steel contact points, and permanently removes interior width.
- The standoff gap created by the bracket system is the mechanism that allows closed-cell spray foam to form a continuous vapor barrier behind the studs. The bracket and the foam are a system; neither works correctly without the other.
- ContainerVents’ explicit guidance: wood studs are acceptable for non-human-occupied spaces; steel studs are recommended for container homes. Moisture and temperature cycling in a lived-in container is more demanding than a storage application.
- 1-5/8” steel studs gain approximately 2 inches of interior width per wall pair versus 2x4s. In a 7’8” container, that difference is the difference between feeling tight and feeling livable.
- Install ceiling brackets and joists first. Wall stud heights are then cut to fit under the installed ceiling — ceiling-first eliminates shimming and adjustment work that wall-first framing requires.
- The container roof is the highest-priority insulation surface. Target minimum 3 inches of closed-cell spray foam on the ceiling (R-18 to R-21). Prioritize roof insulation thickness over all other surfaces.
- Composite lumber is the correct wood alternative for humid environments — marine applications, high-humidity climates, Pacific Northwest builds. It maintains structural properties without organic fiber susceptibility to moisture damage.